Garage Door Zone Support Manuals
  • Home
  • Liftmaster Openers
    • 1265LM Opener Manual
    • 1280LM Opener Manual
  • Linear Openers
    • LDCO800 Opener Manual
    • LDO33 Opener Manual
    • LDO50 Opener Manual
    • Parts List Linear Openers
  • Marantec Openers
    • Synergy 270 Marantec Opener Manual
    • Synergy 370 & 380 Marantec Opener Manual
    • M4500e & M4700e EOS Opener Manual
    • M4900e EOS Marantec Opener Manual
    • M4500 & M4700 Opener Manual
    • Q7500 & Q7700 Opener Manual
    • M55 Marantec Opener Manual
    • Mac-Lift III Opener Manual
  • Raynor Openers
    • Admiral II Opener Manual
    • Airman II Opener Manual
    • Aviator Opener Manual
    • Aviator II Opener Manual
    • Corporal Opener Manual
    • Navigator Opener Manual
    • Pilot II Opener Manual
    • Pilot Opener Manual
    • Prodigy Opener Manual
    • Ultra Opener Manual
    • R130-7 / R130-8 Opener Manual
    • R170 / R270 Opener Manual
    • Flitestar Opener Manual
  • DigiCode Remotes
    • DC5200 Keyless Entry Instructions
    • 5012 DigiCode Remote Instructions
  • Genie Remotes Instructions
    • GM3T-BX Master Universal Remote Instructions
    • G3T-BX Remote Instructions
    • GK-BX Genie Wireless Keyless Entry Instructions
    • GT912 Remote Instructions
  • Liftmaster/Chamberlain/Sears Remotes Instructions
    • 371LM and 373LM Liftmaster Remote Instructions
    • 374UT Mini Universal Liftmaster Remote Instructions
    • 377LM Liftmaster Keyless Entry Instructions
    • 890MAX, 893MAX and 895MAX Liftmaster Remote Instructions
    • 891LM Liftmaster Remote Instructions
    • 878MAX Liftmaster Keyless Entry Instructions
    • 877MAX Liftmaster Keyless Entry Instructions
    • 971LM Remote Instructions
    • 977LM Liftmaster Keyless Entry Instructions
  • Liftmaster Misc. Instructions
    • Liftmaster 828LM Internet Gateway
    • 78LM Liftmaster Wall Control Panel
    • Liftmaster 883LM Door Control Button
    • Liftmaster 829LM Garage Door Opener Monitor Manual
  • Linear Radio Control Instructions
    • Linear MCT-11 MegaCode Remote Instructions
    • Linear MCT-3 MegaCode Remote Instructions
    • Linear LPWKP Garage Door Opener Keypad Instructions
    • Linear MDTK MegaCode Keyless Entry Instructions
    • Linear DT1 Delta 3 Remote Instructions
    • Linear DT2A Delta 3 Remote Instructions
    • Linear DR Delta 3 Receiver Instructions
    • Linear DTKP Delta-3 Keyless Entry Instructions
    • Linear MDR Receiver Instructions
  • Marantec Remotes Instructions
    • Marantec 382 Digital Remote Programming Instructions
    • Marantec 384 Digital Remote Programming Instructions
    • Marantec 392 Digital Remote Programming Instructions
    • M13-631 Keyless Entry Instructions
    • M3-2312 Marantec Remote Instructions
    • M3-3313 Marantec Remote Instructions
    • M3-2314 Marantec Remote Instructions
    • M3-631 Keyless Entry Instructions
    • ML Series Remote Instructions
    • ML-631/ML-639/ML-640 Keyless Entry Instructions
  • Marantec - Misc. Instructions
    • 75424 Plug-In Radio Receiver Instructions
    • M3-543 Wall Control Panel Instructions
    • Command133 Wireless Wall Control Panel Instructions
    • Marantec M8-705 Sensors Instructions
  • MultiCode Remotes Instructions
    • MultiCode 3070 Remote Instructions
    • MultiCode 3089 Remote Instructions
    • MultiCode 420001 Instructions
    • MultiCode 1090 Radio Receiver
    • DigiCode DC5200 Instructions
  • Raynor Remotes Instructions
    • 890RGX Remote Instructions
    • 891RGD Remote Instructions
    • 893RGX Remote Instructions
    • 877MGX Remote Instructions
    • 371RGD & 373RGD Remote Instructions
    • 971RGD Remote Instructions
    • 973RGD Remote Instructions
    • 81RGD Raynor Remote Instructions
    • 83RGD Raynor Remote Instructions
    • 61RGD & 63RGD Raynor Remote Instructions
    • 62RGD & 64RGD Raynor Remote Instructions
  • Raynor Misc. Parts Instructions
    • 882RGD Raynor Wall Control Station Instructions (Security+2.0)
  • Misc. Garage Door Parts
    • Gears and Sprockets >
      • Belt Gear Assy Liftmaster
      • Chain Gear Assy Liftmaster
      • 15-Tooth Operator Sprocket
      • 6-Tooth Operator Drive Sprocket
      • 27096A Genie Chain Drive Gear
    • Adjustable Garage Door Opener Reinforcing Bracket
    • Genie Opener Arm Kit
    • LED Light Bulb
  • Helpful Tips and Information
    • How To Replace Garage Door Bottom Seal
    • How To Find The Correct Marantec Remote
  • Contact Us
  • Garage Door Zone Store

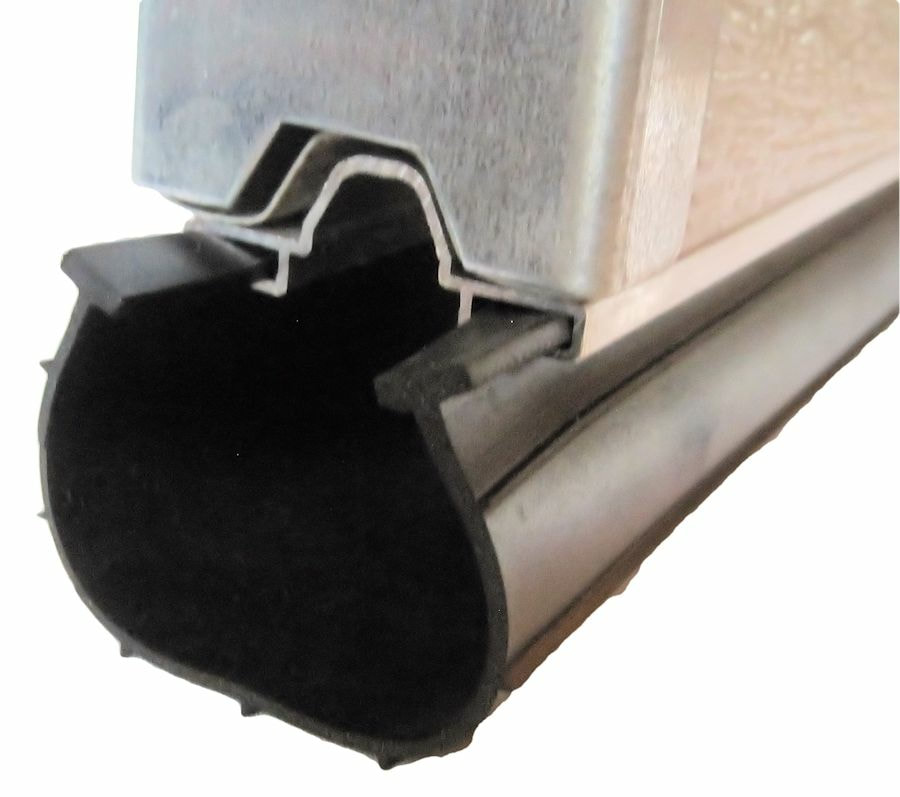
Find the Correct Bottom Seal for Your Garage Door and How To Install It

Picture
If you have a steel garage door that's been on your home for a while then you most likely have a bottom seal on the garage door that is cracked, hardened or torn. Years of being in the elements can damage the seal along with chipmunks & squirrels that want to get in your garage for that birdseed you have sitting in there. You'll be able to seal up the garage, keep out the elements and hopefully the critters by replacing the worn out seal with some new seal.

Replacing the bottom garage door seal is not difficult but it can be frustrating so we'll go through some steps below that will hopefully take away some of that frustration.

  1. Determine What Seal You Need - there are different styles of seals. There are some common ones that many manufacturers use and then a few odd ones. You'll need to determine what seal you need and it's best if you can cut a piece off of the existing bottom seal. Raise you door part way so you can reach the bottom seal and if you can cut a 2" to 3" piece of the seal off (scissors usually work well). Also take a few pictures of the seal and retainer (that's the aluminum piece the seal slides into) - we'll discuss the pics a little later.
  2. Measure The Bottom Seal - take the piece of seal you cut and take a measuring tape or ruler to get some measurements. Measure the width of the seal as it lays flat. Next you'll want to determine what "style" of seal it is. The most common "style" is the T-style seal but there are also P-Bulb style, Bead style, T-Bulb style and others. On the T-style seal these are the parts of the seals that look like a "T" and slide into the bottom seal retainer. You'll want to measure these T's on the seal as this will determine which seal will fit into the bottom seal retainer. You're basically measuring the side of the seal. Write down your measurements. The most common widths are 3" and 4" (but could be anywhere from 2-1/2" to 4-1/2"). The most common "T" measurements are 1/4" and 5/16".
  3. Measure the Width of the Garage Door - don't measure the garage opening as your garage door may be slightly larger so take an accurate measurement of the width. Single car doors will be around 8' to 10' wide while 2-car doors will be 16' to 18' wide. Garage doors can be made any size though in 1" increments so that's why it's important to measure the door and not the opening.
  4. Order or Pick Up Your New Seal - now that you have the measurements you can get the new seal. You can go to a local hardware but they may not carry the seal you need as most may only carry the 5/16" T-style seal but not the 1/4" T-style seal. At the GarageDoorZone.com we carry the 1/4" T-style seal in 3" and 4" widths in vinyl and rubber and the 5/16" T-style seal in 4" rubber. Whether you get it locally or online be sure to get it 5" to 6" longer than the length you need (we'll cover why later). At the GarageDoorZone.com store we ship all of our seals 6" longer than what you order at no extra cost. You can shop for bottom door seals here.
  5. Check Your New Seal - before you remove the old seal from your door check & make sure the new seal will work. Take measurements of it & compare it to your old seal. Also take the new seal & see if you can slide the seal into the retainer a little bit & that the "T" part of the seal fits in the retainer easily without being too hard to put in or too loose and falling out.
  6. Unplug the Opener & Lift the Door  - now that you have the proper seal for your garage door you can install it. First you should take a few safety precautions: A) Unplug the garage door opener (you don't want someone to accidentally pushing a remote while you're working on the door). B) Pull the red emergency cord on the opener to disengage it from the door and lift the door manually. At this point if you can't lift the door or it's too heavy to lift you should stop & call a professional as there may be something wrong with the door springs. A balanced garage door should be easy to lift manually.  
  7. Raise the Door - raise the door up until the bottom of the garage door is just below where the horizontal track curves away from the vertical track (about 3/4 of the way open). Put vise grips on the vertical track just below the bottom roller to keep the door from drifting closed while you work on it.      
  8. Remove Old Seal - pull the old seal out of the aluminum retainer. The ends of the seal may be tucked back into the retainer & need untucked first or sometimes screws are put in near the ends of the seals to hold it in place so look for those & remove them if your having trouble pulling the seal out. You may also need to use a utility knife & cut down the length of the seal and pull the seal out in pieces.  
  9. Clean the Aluminum Retainer - use a wet cloth & wipe down the entire length of the retainer (this is the part of the door the seal slides into). You can also take a screwdriver and run it the entire length of each channel & make sure it's smooth. If you find any parts that are dented or bent use needle nose pliers to straighten the channels.
  10. Lubricate the Retainer - use a bucket with some soapy water and a rag or sponge and coat the entire retainer so it's dripping wet. This will help let the seal slide through the retainer channels. You could also use a lubricant but be careful as it could have an adverse reaction with the rubber or vinyl seal you're installing (soapy water works best). 
  11. Find A Helper - if you want to take some of the frustration out of installing bottom seal then find someone to help you at this point. It is much easier with two people.
  12. Install the Seal - if you found a helper then you will put both of the "T" parts of the seal into the retainer channels and start pulling it while your helper will "feed" the seal into the retainer while keeping the seal they're feeding level with the bottom of the door as they "feed" it to you. This will keep the seal you're pulling from flopping over & catching. If you're trying to do this by yourself then you'll need to keep going back & forth from trying to "feed" the seal in and then going over & pulling it through.
  13. Fold the Seal - once you have the seal pulled the length of the door you should have about 3" sticking out beyond the width of the door. Now fold that 3 extra inches of seal back onto itself so it goes inside the retainer. Do this on both ends of door. Some people put screws into the seal to hold it but there's no need to put extra holes into your door. Folding the seal back onto itself will hold the seal in place.
  14. Lower the Door - remove the vise grips from the track and lower the garage door. Engage the door to the garage door opener (check your garage door opener manual - most will re-engage automatically). Plug your garage door opener back into the outlet.
  15. Run the Garage Door Opener - sometimes a new seal will add a little height to the door (since it's not all flattened out like the old seal) so it's a good idea to run the opener & see if it closes properly. If the door goes down and then reverses once it hits the floor you'll need to adjust the close travel limits on the operator so it doesn't go down as far. Follow the instructions in the operator owners manual for instructions on travel limit adjustments.
  16. YOU DID IT - you now have new bottom garage door seal that should last for years and help keep your garage warm and dry.

You can see and purchase bottom seals at the Garage Door Zone Store. If you're still not sure what will work in your garage door you can get a Sample Pack of the seals here. Test out the seal and see how well it fits in your garage door seal retainer before you buy a larger piece that may not work.
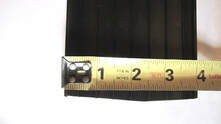
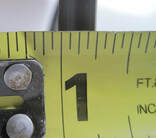
Bottom door seal ad
Bottom Garage Door Seal
Measure the width
T-style bottom garage door seal
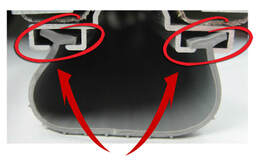
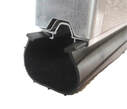
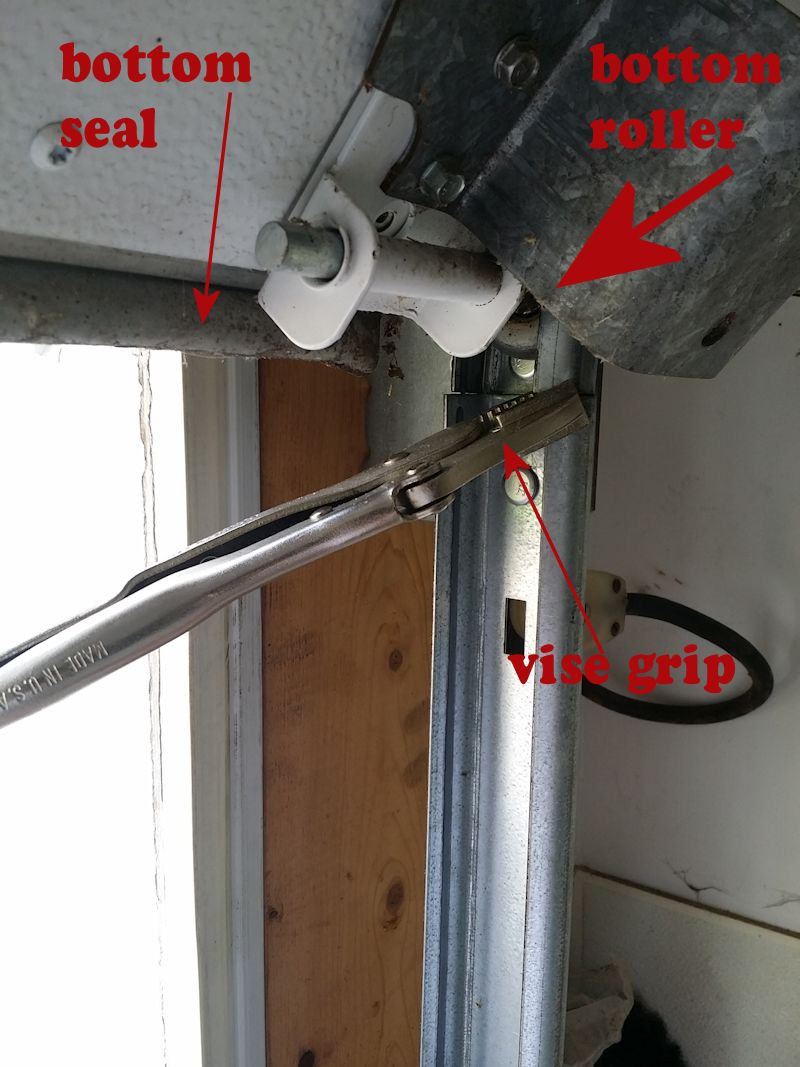
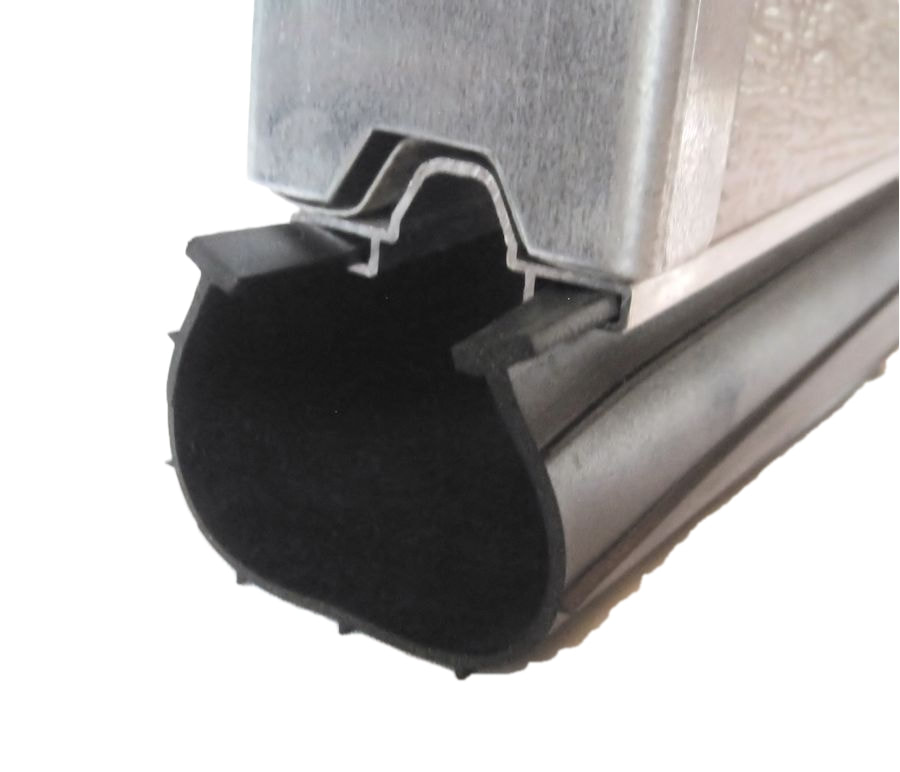
The "T" parts of the seal
T-style bottom garage door seal
Measure the "T" part of the seal
Picture
Picture
Picture
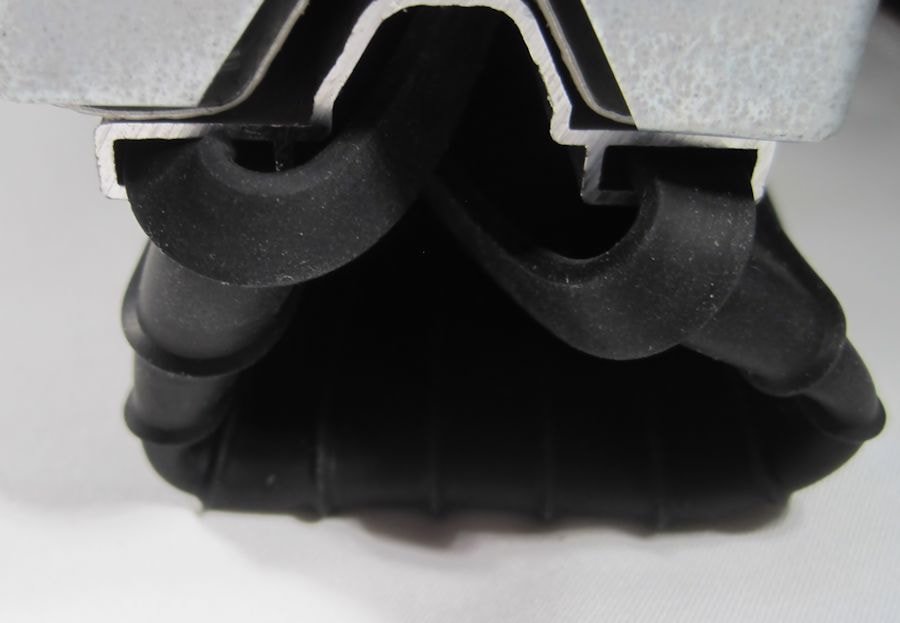
End of seal folded back onto itself
3" Gray 1/4" T-style bottom garage door seal
3" wide Vinyl 1/4" T-style Seal
4" Gray 1/4" T-style bottom garage door seal
4" wide Vinyl 1/4" T-style Seal
3" Black rubber 1/4" T-style bottom garage door seal
3" wide Rubber 1/4" T-style Seal
4" Black Rubber 1/4" T-style bottom garage door seal
4" wide Rubber 1/4" T-style Seal
4" black rubber 5/16" T-style bottom garage door seal
4" wide Rubber 5/16" T-style Seal
Have a question?
Send an email to us at: Tips@GarageDoorZone.com and we'll try to help you out.

Shop for bottom garage door seals
Still need more information? Check out our other sites....
Garage Door Zone Store
Picture
YouTube Channel
Garage Door Zone Blog
Contact Us

Visit our Store: GarageDoorZone.com


YouTube Help Videos

​https://www.youtube.com/c/Garagedoorzone

Email

info@GarageDoorZone.com